
One exciting trend in AI is the use of large language models (LLMs) to create agents that can autonomously perform tasks. As someone fascinated by these developments, I’ve been trying to understand how these agents are created.
There are various frameworks for this purpose, including LangGraph, CrewAI and AutoGen. After taking this short course on creating agentic workflows using Autogen, I leveraged this framework to build an agent.
I started with a simple example: a weather chatbot that can fetch current weather information to answer queries. In this blog post, I’ll walk through all the steps needed to put this together.
Contents#
- What is AutoGen?
- Overall Sketch
- Jupyter Notebook
- Getting API Keys
- Creating the Weather Assistant Agent
- Implementing Tool Use
- Chatting with the Weather Assistant
- Demo
- Conclusion
What is AutoGen?#
AutoGen is an open-source Python framework for creating agentic AI systems using LLMs. Using this framework, you can create agents that interact with each other, use tools, and participate in custom conversation patterns.
Overall Sketch#
Here’s a diagram of how we’ll set up the workflow for the weather chatbot:
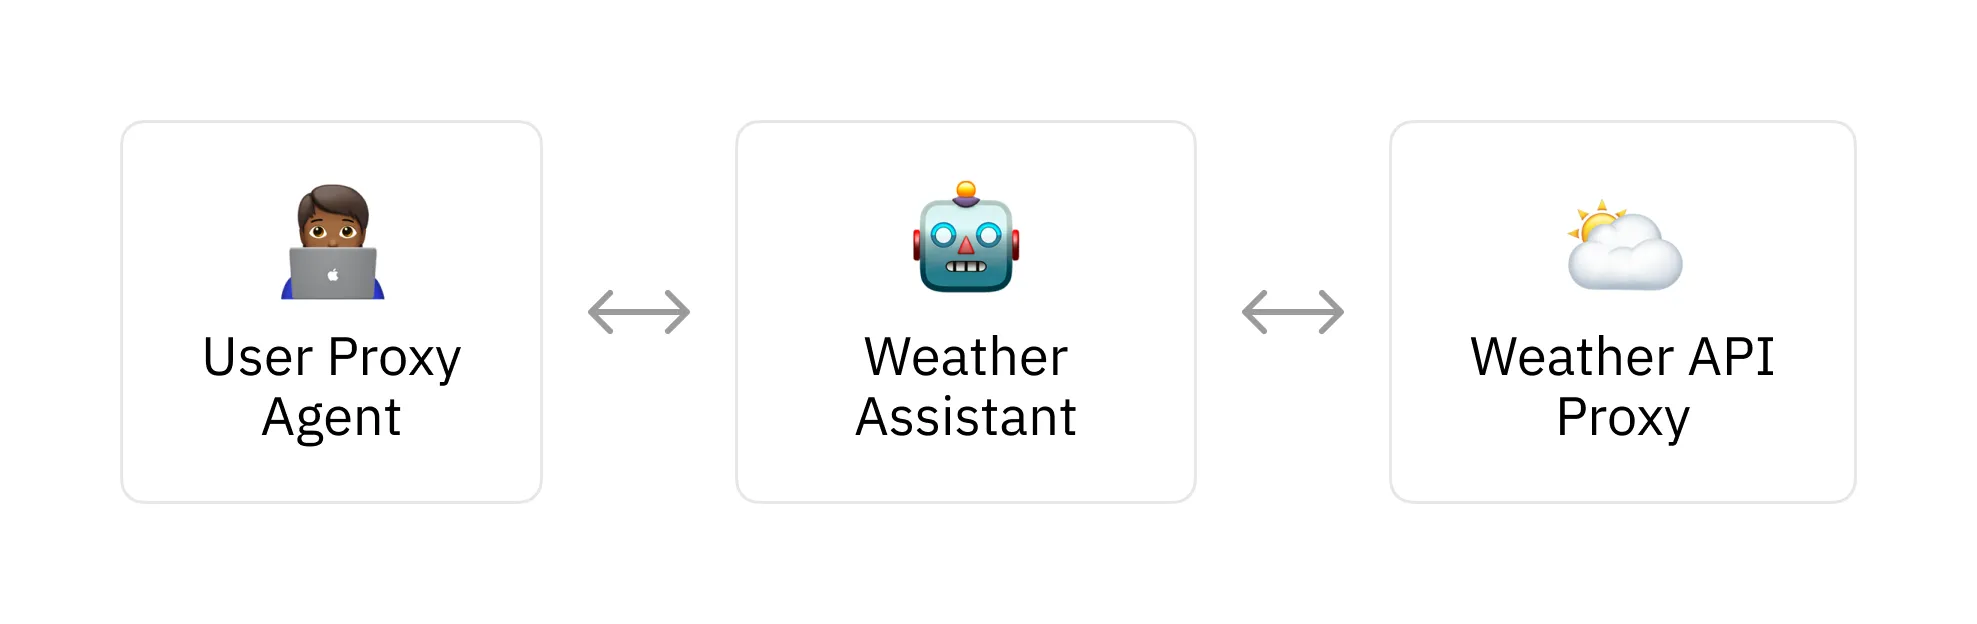
The user proxy agent facilitates communications between the user and the weather assistant. It prompts the user to provide feedback whenever it receives a response from the weather assistant.
Furthermore, the weather assistant responds to user queries using a LLM. It also fetches information about current weather conditions by making API requests to OpenWeather REST API with the help of the weather api proxy agent.
Jupyter Notebook#
You can find the code for this example in this Github repo.
Getting API Keys#
For this weather chatbot example, you’ll need to get API keys from OpenAI and OpenWeather. Follow the instructions in these links to get started:
Create these two global variables to hold the API keys once you have them:
OPENAI_API_KEY = "<insert-api-key>"
OPENWEATHER_API_KEY = "<insert-api-key>"
Creating the Weather Assistant Agent#
AutoGen provides the ConversableAgent class for creating custom agents. We can write the following to create our weather assistant agent:
from autogen import ConversableAgent

llm_config = {
        "config_list": [{"model": "gpt-4o-mini", "api_key": OPENAI_API_KEY}],
        "cache_seed": None,
    }

weather_assistant = ConversableAgent(
    name="Weather Assistant",
    system_message="You are a helpful AI weather assistant. "
    "You can help with providing recommendations to the user based on available weather data. "
    "Return 'TERMINATE' when the task is done.",
    llm_config=llm_config,
    is_termination_msg=lambda msg: "terminate" in msg.get("content").lower(),
)
Using this class, you can name agents and provide them a system prompt using the name and system_message arguments, respectively.
The llm_config argument sets up parameters for LLM used by the agent and an API key for. This example uses gpt-4o-mini. By default, Autogen will cache the agent’s responses. Setting the cache_seed to None disables this.
You can also instruct an agent on how to end conversations using the system prompt. Here, we’ve instructed the agent to “Return ‘TERMINATE’ when the task is done.” in the is_termination_msg argument. The agent will check if the word “terminate” appears in its speech output to decide whether to end the conversation.
Implementing Tool Use#
To implement tool use, we have to first create the proxy agent responsible for sending requests to the OpenWeather API and routing the API response to the weather assistant:
weather_api_proxy = ConversableAgent(
    name="Weather API Proxy",
    llm_config=False,
    default_auto_reply="Make an API request to get the latest weather as needed",
    human_input_mode="NEVER",
    max_consecutive_auto_reply=1,
)
We set the LLM config to False because this agent won’t use an LLM to generate its responses.
We’ll now define a function for getting the weather using the OpenWeather REST API:
import httpx
def get_current_weather(
    lat: Annotated[float, "Latitude of the weather location"],
    lon: Annotated[float, "Longitude of the weather location"],
) -> dict:

    base_url = "https://api.openweathermap.org/data/3.0/onecall"
    arguments = f"?lat={lat}&lon={lon}&appid={OPENWEATHER_API_KEY}&units=metric"

    endpoint = f"{base_url}{arguments}"
    response = httpx.get(endpoint)

    return response.json()
This function uses the httpx library to fetch current weather information from the API endpoint for the input latitude and longitude. Learn more details about the API response schema by reading here.
Next, we need to register the function with the agents defined earlier:
from autogen import register_function
register_function(
    get_current_weather,
    caller=weather_assistant,
    executor=weather_api_proxy,
    description="A tool for obtaining weather information. Units are given in metric.",
)
In this scheme, the weather assistant retrieves weather information from the OpenWeather API by making a request to the Weather API Proxy.
Furthermore, the Weather API Proxy agent executes the request and returns the API response to the weather assistant. This is why the caller and executor arguments are assigned to the weather_assistant and the weather_api_proxy, respectively.
Finally, the description argument provides context to the weather assistant on what the tool is to be used for.
Chatting with the Weather Assistant#
The next step involves creating a user proxy agent to facilitate communication with the weather assistant:
user_proxy = ConversableAgent(
    name="User",
    llm_config=False,
    is_termination_msg=lambda msg: msg.get("content") is not None
    or "terminate" in msg.get("content").lower(),
    human_input_mode="ALWAYS",
)
With argument human_input_mode="ALWAYS", the agent will prompt the user to respond to messages it receives from the weather assistant.
Now, let’s set up the chat between the user proxy agent and the weather assistant. We can create the initial message like so:
chats = [
    {
        "sender": weather_assistant,
        "recipient": user_proxy,
        "message":
            "Hello, I'm here to provide recommendations based on the current weather."
            "How may I help you?",
        "summary_method": "reflection_with_llm",
        "max_turns": 2,
    }
]
This defines the sender of the initial message and its recipient. The summary_method set to ”reflection_with_llm" will get the weather assistant to generate and share a summary of the chat after it ends. Here, max_turns will allow the conversation to take two round trips between the user proxy agent and the weather assistant.
We can now start the chat by running the following command:
from autogen import initiate_chats
initiate_chats(chats)Demo#
Here’s an example of a chat looks like:
********************************************************************************
Starting a new chat....

********************************************************************************
Assistant (to User):

Hello, I'm here to provide recommendations based on the current weather.How may I help you?

--------------------------------------------------------------------------------
Provide feedback to Assistant. Press enter to skip and use auto-reply, or type 'exit' to end the conversation:  I'm in Los Angeles, CA. Do I need an umbrella right now?
User (to Assistant):

I'm in Los Angeles, CA. Do I need an umbrella right now?

--------------------------------------------------------------------------------

Assistant (to Weather API Proxy):

***** Suggested tool call (call_06KXxPULAtvhPFwxpzXhYftQ): get_current_weather *****
Arguments:
{"lat":34.0522,"lon":-118.2437}
************************************************************************************

--------------------------------------------------------------------------------
Assistant (to User):

Currently in Los Angeles, CA, there are scattered clouds, but there is no precipitation expected.
The chance of rain is 0%. Therefore, you do not need an umbrella right now.
I’ve trimmed the chat log to contain the most relevant sections. The full log contains more content such as the conversation between the weather API proxy and the weather assistant.
What’s interesting is that the LLM used for the weather assistant already has implicit knowledge of the coordinates of Los Angeles, CA. In more practical cases it would be good to validate the coordinates generated by the LLM to ensure they are correct.
Conclusion#
In this blog post, I’ve illustrated how to set up a weather assistant using the Autogen library. This included a walkthrough on implementing tool use and the steps for chatting with our agent.
As we’ve seen, modern frameworks offer helpful abstractions to build functional agents. With the relentless pace of AI innovation, it’s exciting to imagine how much easier and more versatile agent creation might become in the near future.